Note: From List & Label in Version 27 there is the possibility to use List & Label without a printer driver. This is especially important in cloud environments like Azure or AWS, where printers are often not installed and cannot be re-installed for security reasons. Easily host your application in a Windows Docker container starting with version 27.
Introduction
This article gives insight about the most important concepts and source code snippets for using List & Label with Microsoft Azure. The sample demonstrates the communication between two roles for exporting reports in PDF or JPEG format (more export formats could be easily added).
Requirements
- Operating system: Windows 10, Windows 8.1, Windows 8, Windows Server 2008 and higher
- Visual Studio 2015 SP3, Azure SDK 2.9, Azure Tools for Visual Studio
Limitations
Azure WebApps cannot be used with List & Label because they do not allow access to printers. See the corresponding thread in the MSDN forum.
Unfortunately, Azure Functions cannot be used either. These run in a Sandbox, which suppresses all calls to the Windows GDI for security reasons.
Setting up a Visual Studio Project
Step 1: Create a New Project
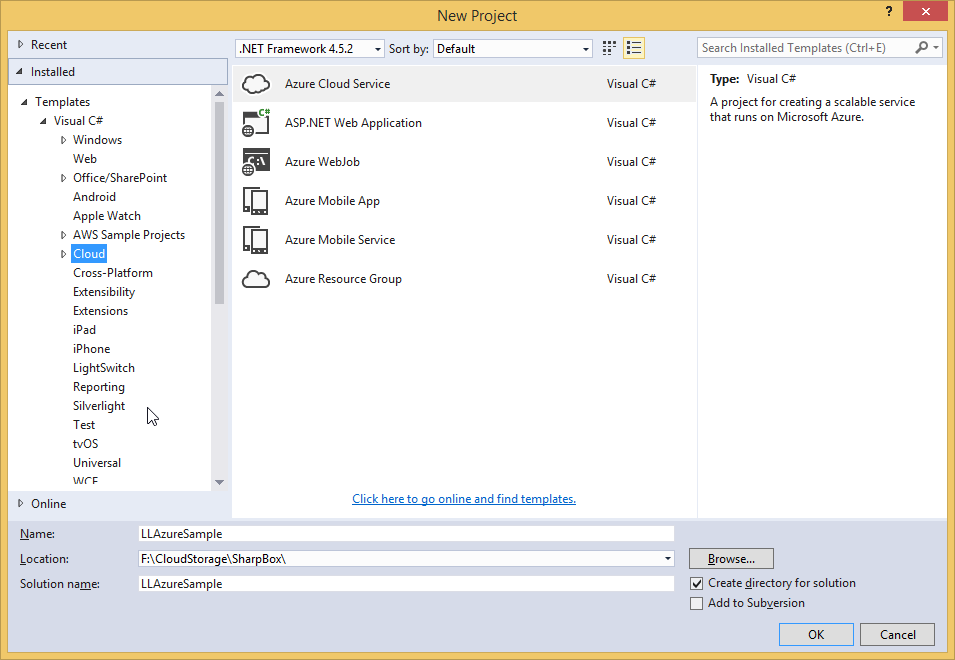
After successfully installing “Azure Tools for Visual Studio”, create a new project in Visual Studio. In the Templates tree under the Visual C# and Visual Basic branches there is now a new template type named “Cloud”. Select this template type and choose “Azure Cloud Service” and confirm the dialog with “OK”.
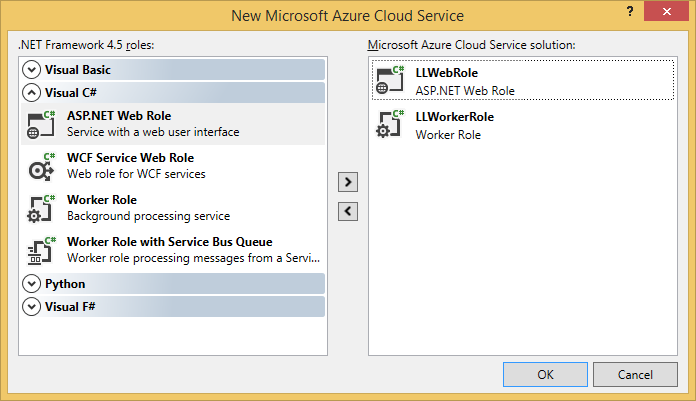
Now you can add the roles “Web Role” and “Worker Role” to the project.
Step 2: Add a Reference to List & Label
To use List & Label in this project you have to add a reference to the List & Label .NET Assembly “combit.ListLabel??.dll” to your project via the context menu “Project > Add Reference …”. The Assembly is located in the List & Label installation directory in the subfolder “Programmable Samples and Declarations\Microsoft .NET\Assemblies”. In this sample the reference is added to the Worker Role project.
Step 3: Microsoft Azure Blob Storage
A Blob Storage is nothing more than a memory for large binary data. In this sample, it will be used to store the generated reports. To use this storage you need a connection string. This can be added to the properties of the individual roles. It is important that you add this connection string in both “Web Role” and “Worker Role” settings. To set the Connection String open the Solution Explorer and navigate to the Cloud Service project and open the settings from the context menu by clicking Properties for both roles.
In the Properties dialog select the Settings tab and set Service Configuration to “All Configurations”. There should be a Connection String setting with the name Microsoft.WindowsAzure.Plugins.Diagnostics.ConnectionString; if not, just add it and set the type to Connection String. You should set the Connection String for the Local (development environment) and the Cloud (production environment) Service Configurations separately. After defining the Connection String setting in the “All Configurations” mode change the Service Configuration to Local and set the Connection String value to “UseDevelopmentStorage=true”. (Hint: It is recommended to manually type in the Value input field as clicking the … button seems to freeze Visual Studio.)
Then change the Service Configuration to Cloud and set the Connection String value to DefaultEndpointsProtocol=https;AccountName=<YourCloudStorageAccountName>;AccountKey=<YourCloudStorageAccountKey>.
Then save the changes for the Web Role properties and repeat this process for the Worker Role properties as well.
Blob Storage will then be accessible with the following few lines of code:
// Create container
CloudStorageAccount storageAccount = CloudStorageAccount.DevelopmentStorageAccount;
CloudBlobClient blobClient = storageAccount.CreateCloudBlobClient();
_container = blobClient.GetContainerReference("reports");
_container.CreateIfNotExists();
Step 4: Microsoft Azure Queue
A queue is required for the communication between two roles, so both roles can exchange messages. Such a queue is generated as follows:
Nachrichten austauschen. Eine solche Queue wird wie folgt erzeugt:
// Create queue
CloudQueueClient queueClient = storageAccount.CreateCloudQueueClient();
_queueWork = queueClient.GetQueueReference("llqueuework");
_queueWork.CreateIfNotExists();
You can add a new message to the queue with the method AddMessage(). The method takes either a byte array or a string as a parameter. In this sample, we exchange a string. The structure of a message is as follows:
Report name; Export format (e.g. Report.lst;PDF)
Step 5: The Roles
A Web Role is a simple Web application that will run on an Internet Information Service (IIS). A Worker Role is a role which takes care of the background processing of complex tasks. A cloud service must consist of at least one of these roles, but may contain any number. Both roles by default inherit from the RoleEntryPoint class. This provides methods to initialize, start and stop the role.
In our sample project, the Worker Role is used to export a report in either PDF or JPEG format using List & Label. The Web Role presents the interface layer in this example.
The actual printing of the project is a common “silent export” in the same way that it would be implemented in normal Web applications:
using (ListLabel ll = new  ListLabel())
{
    ll.DebugLogFilePath = Path.GetTempPath() + "LlLogFile.txt";
    ll.Debug = LlDebug.LogToFile;

    // Set print options
    ll.AutoShowSelectFile = false;
    ll.AutoShowPrintOptions = false;
    ll.AutoDestination = LlPrintMode.Export;
    ll.AutoProjectType = LlProject.List;
    ll.AutoBoxType = LlBoxType.None;
    ...

    // Set export options
    ll.ExportOptions.Add("Export.File", fileName + extName);
    ll.ExportOptions.Add("Export.Path", tempPath);
    ll.ExportOptions.Add("Export.Quiet", "1");

    // Set data source
    ll.DataSource = GenericList.GetGenericList();
    ...
    ll.Print(LlProject.List, stream);
}
Step 6: Run the Project
When you run this sample project it opens this site in your web browser:
Flow of the Application
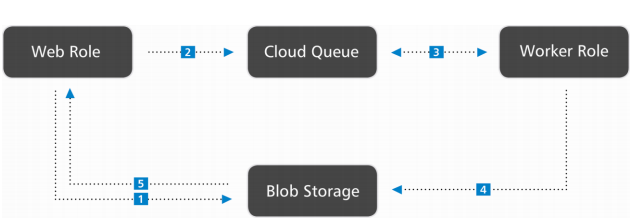
- The user selects a report to load and clicks the button “Create report” where the selected report will be uploaded to the Blob Storage.
- The message is added to the queue.
- The Worker Role watches the queue and reads the message. Then the Worker Role generates a file in the selected format (using List & Label).
- Now the generated report is uploaded to the Blob Storage.
- Finally, the file will be downloaded from the Blob Storage and displayed in the browser.
Deploy to Microsoft Azure Server
There are two ways to deploy the Cloud Service to Microsoft Azure:
Publish Directly From Visual Studio
The simple and standard way is to publish directly from Visual Studio. To do so select “Publish…” from the Cloud Service project context menu.
Hint: During the writing of this Whitepaper, we encountered a bug in Visual Studio Azure Publish: when choosing your subscription sometimes it says that “Cloud Services are not available in this subscription.” Unfortunately we couldn’t find a solution for this behavior. So right now we recommend manual publishing if you encounter problems here as well.
Publish Manually Through Azure Portal
-
At first we need to build a package from our Cloud Service project in Visual Studio. To do so select “Package…” from the Cloud Service project context menu.
-
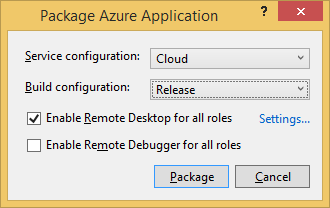
In the “Package Azure Application” window set the Service configuration to Cloud and the Build configuration to Release and choose “Enable Remote Desktop for all roles” and click “Settings…”.
-
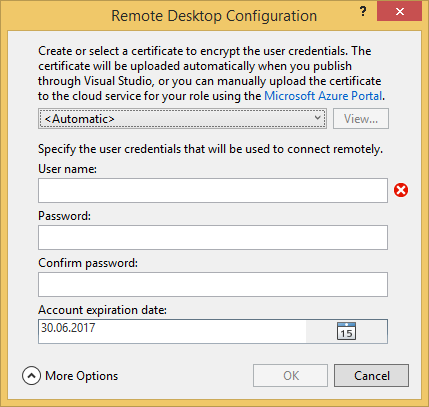
In the “Remote Desktop Configuration” window, create a certificate to encrypt the user credentials and add User name and Password that will be used to connect remotely. (You need to create and upload this certificate just for the first deploy.)
After creating the certificate click on the “View…” button and open the “Details” tab in the Certificate dialog and click the “Copy to File…” button there. In the next dialog click “Next” and then choose the option “Yes, export the private key” and click “Next”. In the next dialog leave the options unaltered and click “Next” and then choose “Group or user names (recommended)” and click “Next”. Then enter a file name for the private key file (the address should be included, e.g. C:\testKey.pfx) and click “Finish” in the next dialog. Now you have a key file that must be uploaded before the Cloud Service in the Azure Portal.
-
Go back to the “Package Azure Application” window and click on the “Package” button. After building and packaging is finished the package files will be ready in the application folder under \bin\Release\app.publish
-
Open the Microsoft Azure portal under https://portal.azure.com, open the Cloud Services and add a new Cloud service.
-
After adding a new Cloud Service click on the name of it to open its Production Environment and Settings. In the Settings panel click on “Certificates” and click on the “Upload” button there.
-
In the “Upload Certificate” panel open the Select File dialog and choose the private key file (e.g. C:\testKey.pfx) that you created in step 3 and type the password that you set there and click “Upload”.
-
After successfully uploading the certificate you can upload the Cloud Service package file. In the Production panel of the Cloud Service click the “Upload” button and choose “Storage account”, enter a “Deployment label” and select the “Package” and “Configuration” files that you created in step 4. Choose the options “Deploy even if one or more roles contain a single instance” and “Start deployment” and click the “OK” button.
Important: To export reports through List & Label you must start the Print Spooler Service on the Worker Role system. After successfully uploading the project, there will be a LLWebRole and LLWorkerRole in the Cloud Service Roles and Instances panel. Click on “LLWorkerRole_IN_0” and in its panel click on the “Connect” button. It will download the required .rdp file to connect to the Worker Role system. Open this file and connect to the Worker Role system. In the Worker Role remote connection, open Services and start the Print Spooler Service.
